


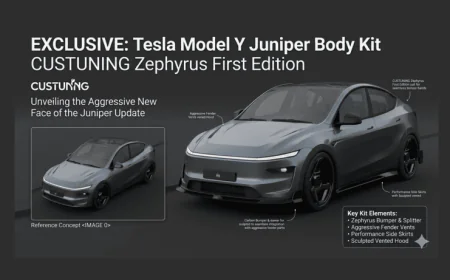


.png)


![[HOONIGAN] Ken Block's GYMKHANA NINE](https://img.youtube.com/vi/_bkX5VkZg8U/maxresdefault.jpg)


![[HOONIGAN] KEN BLOCK'S GYMKHANA SEVEN: WILD IN THE STREETS OF LOS ANGELES](https://cdn.motor1.com/images/mgl/2KlO4/s1/ken-block-london-tour-directors-cut.jpg)


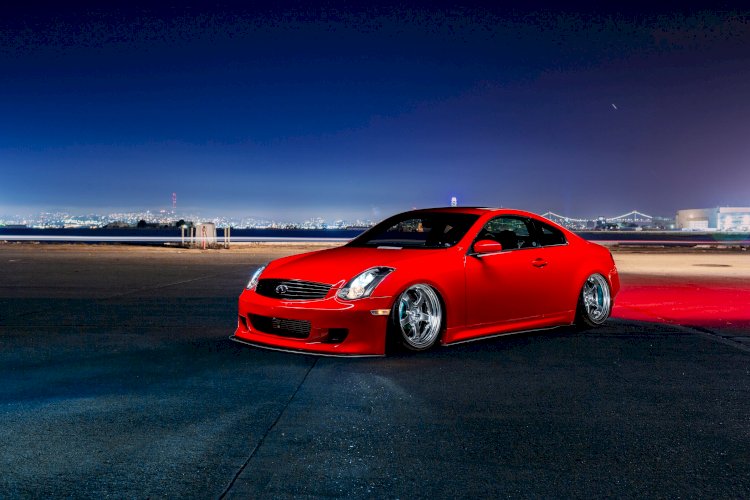
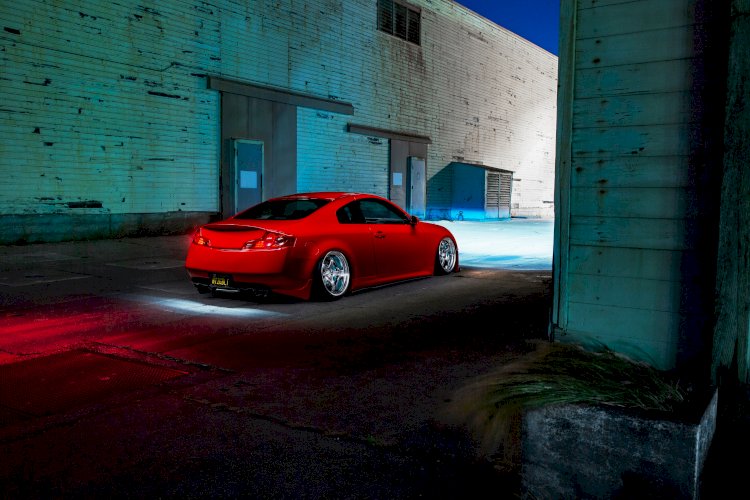
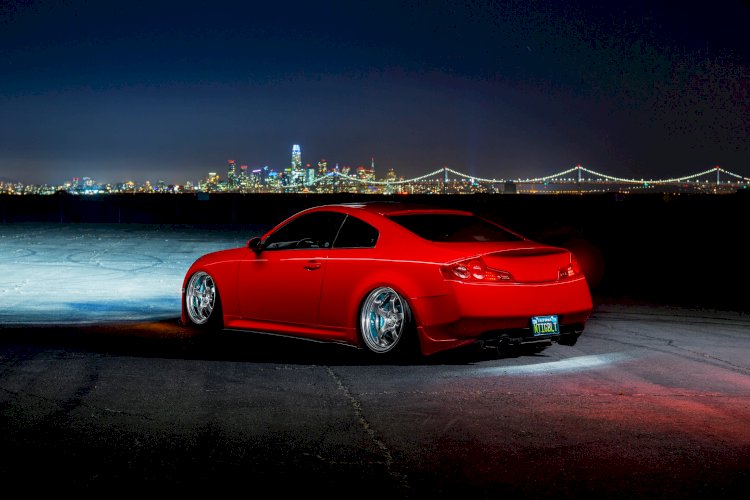
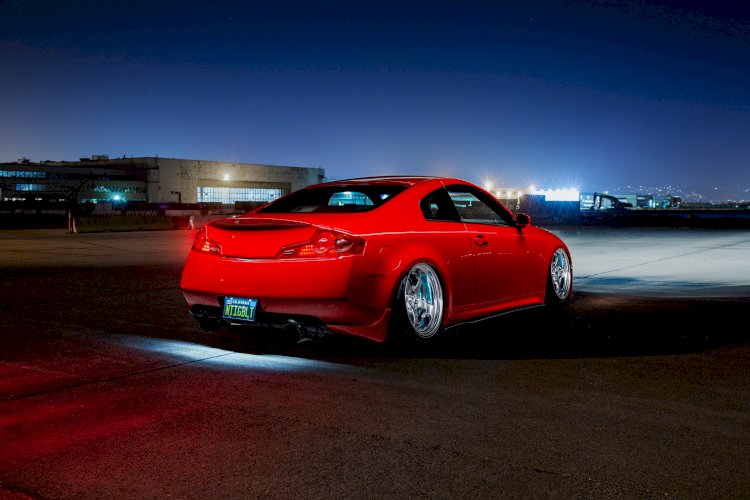
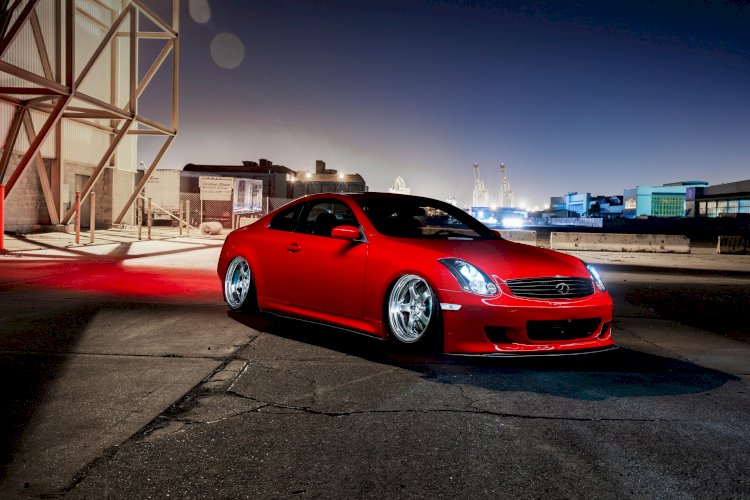
Ray Prado - 2003 Infiniti G35 Coupe
On the other hand, I decided to bring back and rebuild my Integra GSR after recovering the shell and finding the stolen motor for sale on craigslist. During the rebuild process of rebuilding the Integra GSR, my wife wanted to start to modify her G35 coupe.
Join Our Stance Auto Mags Group, Give Our Facebook Page a Like, and Follow us on Instagram
More images are in the slider above, SLIDE LEFT>>>>>>>>>>>
These Photographs are supplied by the Photographer, check their Link for Bookings.
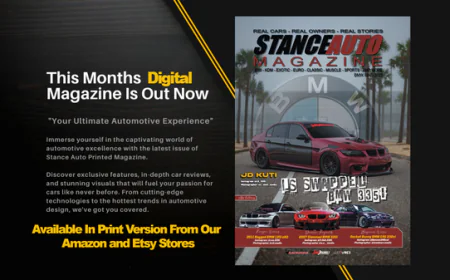
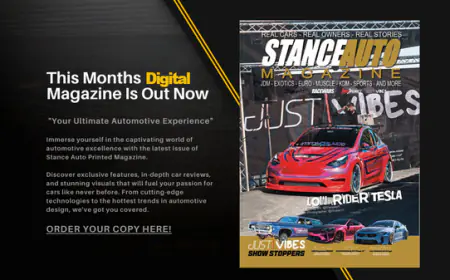
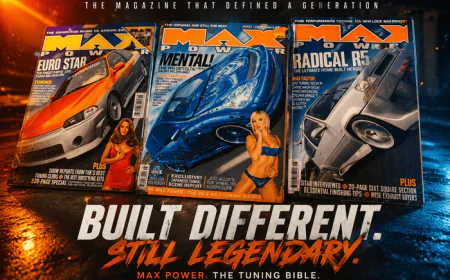
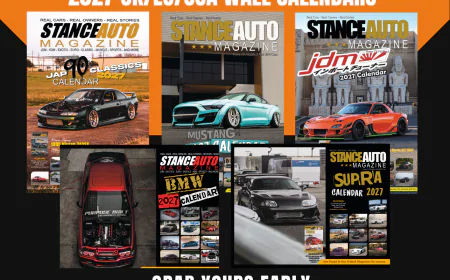
Order the Printed Magazine HERE!!
Ray Prado - 2003 Infiniti G35 Coupe
Photographer: Pat Lauder
My wife and I were previously Acura Integra GSR owners. I've had my Integra since high school and I babied the hell out of the car. Being a member Of the Honda/Acura forums back in the early 2000s and after being inspired by several great builders with shaved and tucked engine bays, I had a list of plans that I wanted to do with the car after I had graduated college. Unfortunately, my plans were cut short at the tail end of 2006 whereas my Acura Integra GSR had gotten stolen at a local strip mall, during the day that I had submitted my two-week notice at my retail job. My girlfriend at the time who is now my wife had her Integra GSR stolen at the beginning of 2006 as well. For a replacement car, my wife had picked up a brand new 2006 G35 coupe from the dealership.
On the other hand, I decided to bring back and rebuild my Integra GSR after recovering the shell and finding the stolen motor for sale on craigslist. During the rebuild process of rebuilding the Integra GSR, my wife wanted to start to modify her G35 coupe. After doing research and buying the first few mods for her car, (moulded trunk lip spoiler, lowering springs, front lip, and wheels) I started to notice that she had a better-looking car than mine. It was also a fun car to drive as well.
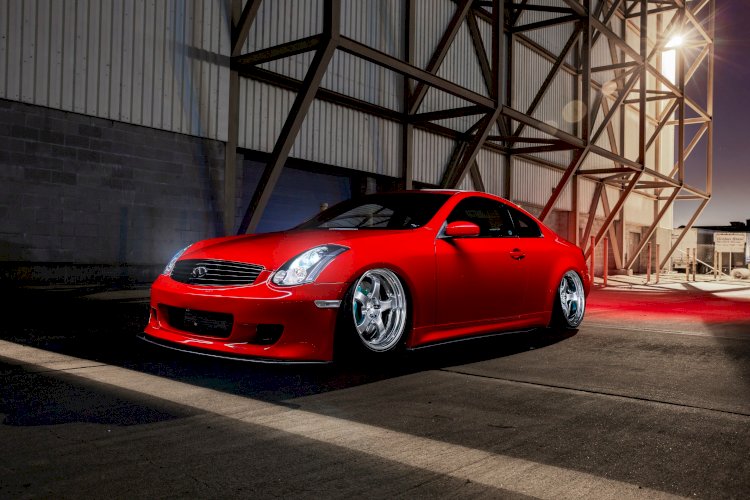
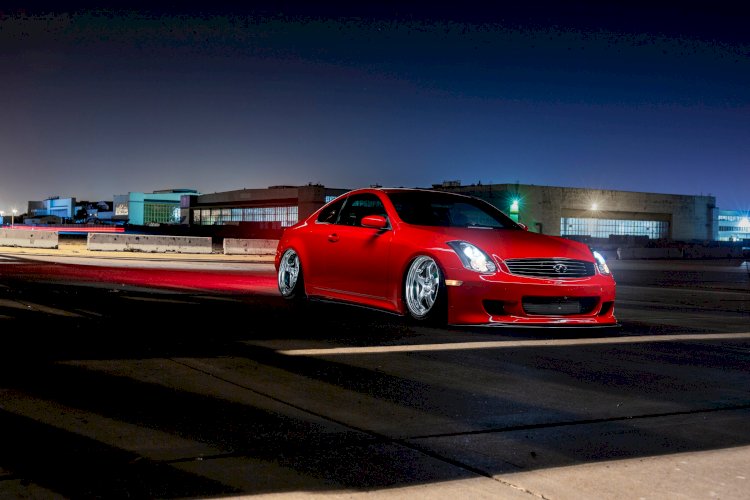
My Integra GSR never really felt the same after rebuilding it, therefore I was on a hunt for a new project car. Since I was familiar with the G35 platform and had several buddies who owned G35s, I decided to look for a used G35 coupe. It took several months till I found one that met my standards. That was when I stumbled across a mint 03 Red g35 coupe at the beginning of 2010. The car was serviced by the dealer, had low miles, was well taken care of, and I had a pre-approved loan from the bank to fund the car. After taking ownership of the car, my goal was to only do a few mods that were similar to my wife's G35: trunk lip spoiler moulded to the factory trunk, aftermarket front bumper, coil-overs, wheels and exhaust.
A month later after purchasing the car, I had dropped It off at Grand Collision in Hayward CA, where they had performed the Install, moulding, and painting of the trunk lip spoiler to colour match the vehicle along with colour matching the inven roof spoiler. While my car getting worked on, I decided to give Chris at Outcast Garage a call. Chris was able to source a Kuruma Front bumper and had immediately shipped it over to Grand Collision for the installation and paint match. After the bodywork was done, I was able to save money and get a nice set of wheels for my car, coil-overs, and an aftermarket exhaust.
After getting the car where I wanted It to be, I had gotten invited by a few buddies to show my car at Wekfest San Francisco in 2011. That’s where the original plans that I had for my car snowballed. After attending the show, I wanted to do way more to the car. Knowing that body kits eventually get old and trends change after time, the goal for my car was to make the G35 clean and simple with a twist. I wanted to leave the exterior close to stock as possible but focus on mods in areas that were hardly looked upon, for example, the engine bay, trunk, and interior.
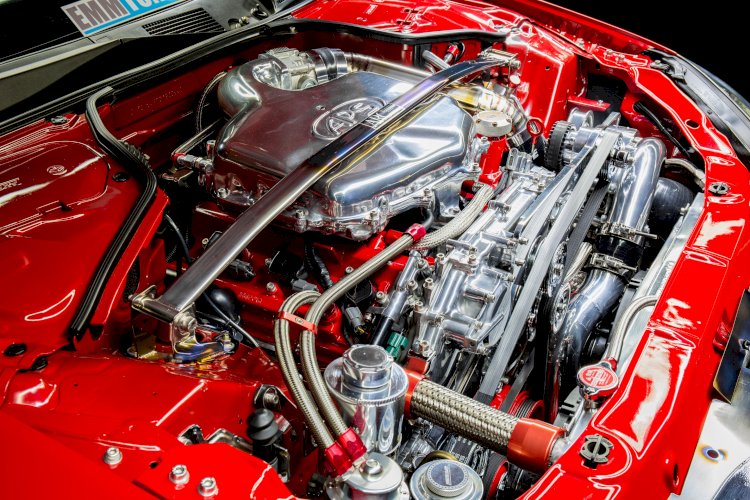
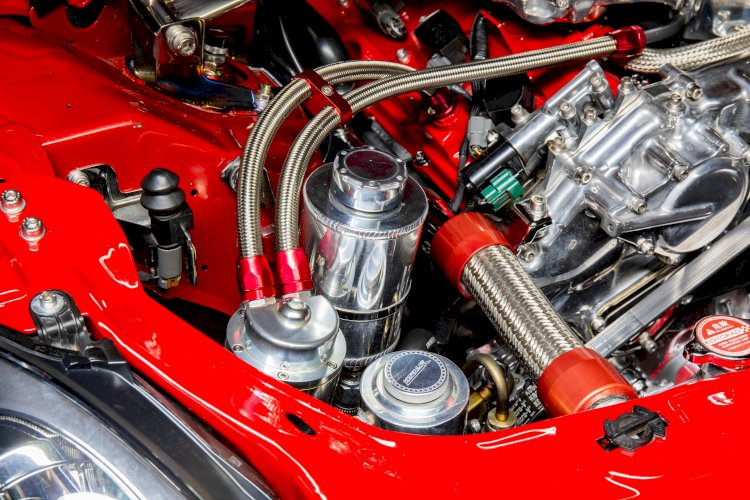
A few days after the show, one of the major mods that I wanted to do was the engine bay. I wanted to do something similar except with a G35 platform and also add a bit of low rider flare with the chrome and polished parts. That was when I was Introduced to Randy Riggs, whom now I consider a good friend of mine. Randy was the go-to person in the G35 community to do full wire tucks and cosmetic engine bay transformations. After back and forth emails, and also getting to know a few g35 owners who had their engine bay worked on by Randy, I was sold. I decided to drive the car out to Southern California and hand the keys over to Randy.
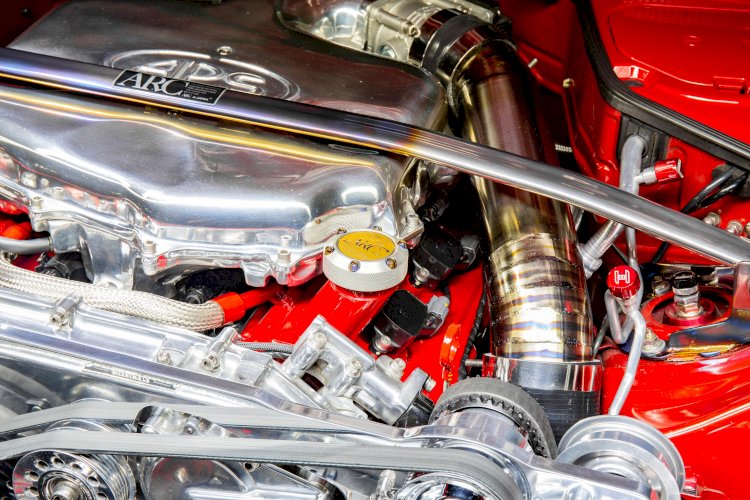
What was supposed to be a full wire tuck that was originally supposed to be performed, ended up being more after speaking with Randy and another G35 owner, Marcus Cooke. I started to do research on power mods with the G35. Since It was very limited with forced Induction mods, I decided to go with a V3 Vortech supercharger. During the time that my car was with Randy, a full wire tuck was performed and along with the installation of the Vortech v3 supercharger, fuel system, and RK titanium charge pipe. Other parts were also Installed as well such as the Polished PS pump, Polished PS tank, polished coolant tank, Chromed Alternator, modded coolant pipes, polished timing cover, Spal Fans, Koyo Radiator, and more.
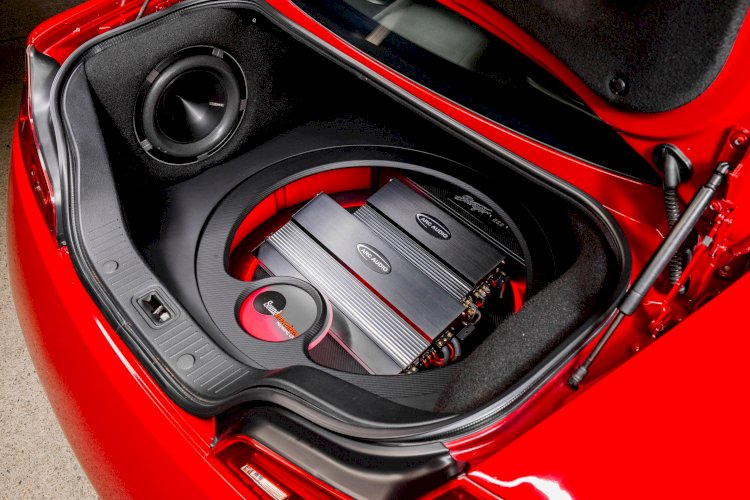
After the engine bay was completed, the audio was next on my to-do list. This is where I had connected with a buddy of mine, Jim Lau, to source the audio equipment, wiring, head unit, etc. I then turned to Ernie and Junior Ngim at Sound Innovations for the execution of the trunk setup. The vision of the system that I wanted to be done was a stealth setup that is functional yet effective at car shows. After dropping off the car, Junior had sound deadened the doors, Installed the hertz components, amps, subs, and fibreglass boxes, as well as designed a false floor along with frosted plexiglass to add a bit of flair to the trunk. A custom cover was made so that I can throw a few grocery bags as well.
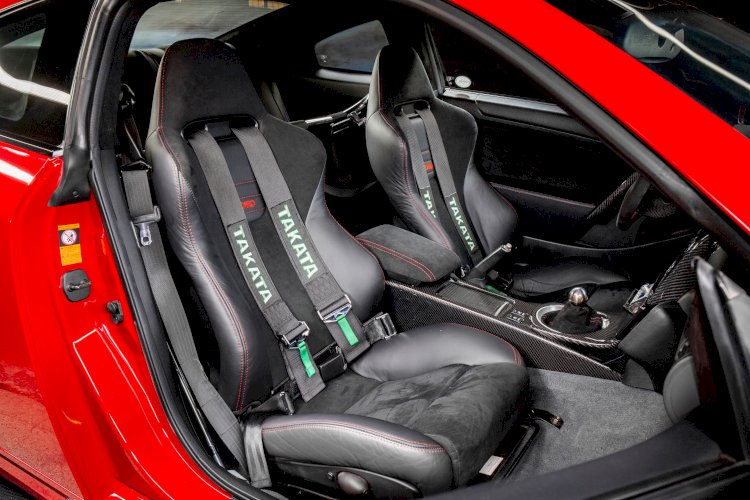
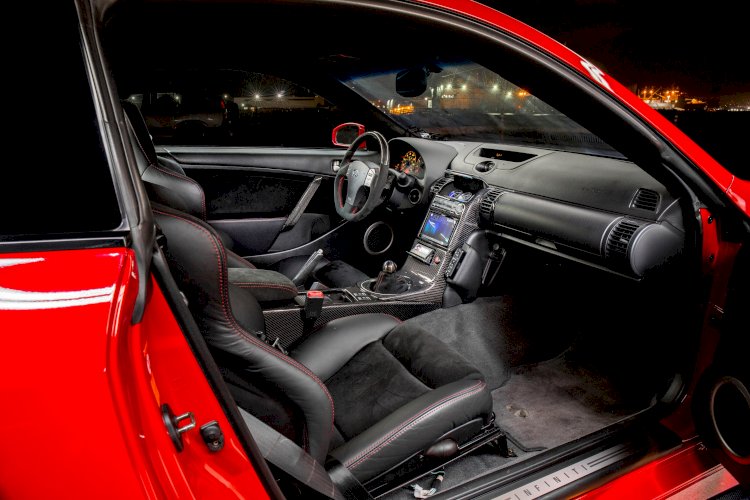
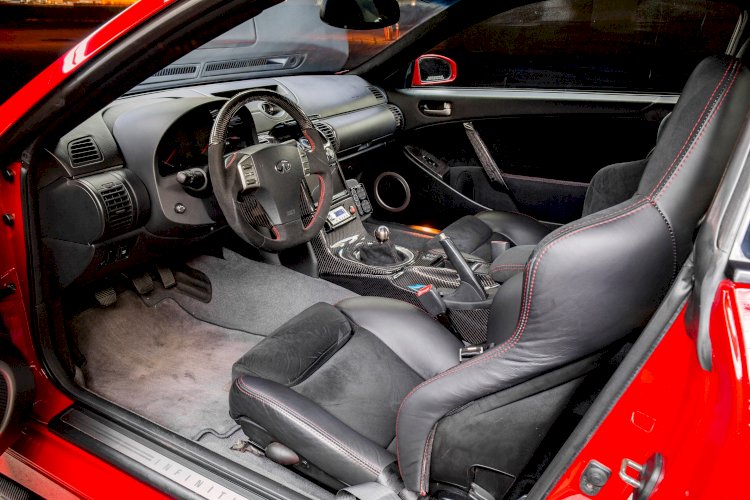
Moving onto the Interior, I had reached out to a good friend of mine, Marty Huynh at Emmtuning who had performed a carbon overlay on several of my Interior parts which consisted of CF door switches, CF door handle covers, CF Center console, CF rear console, CF wiper cowl, etc. Marty had also made a custom steering wheel for the G35 that was reshaped and had Carbon Fiber, Alcantara Suede and red stitching. While my parts were getting fabricated, a buddy of mine who was local to Marty was starting to part out his wrecked G35. That was when I had acquired a pair of Recaro Sport line seats which were pretty beat up. Marty had coordinated with Chuy's Custom Interiors in Carson, CA to reupholster the seats In black Ferrari leather, Alcantara Suede, along with red stitching to add a bit of detail. The rear seats were also reupholstered to match the front seats.
After the Interior was finished, I had looked into big brake kits, preferably Project Mu. After calling a few places around the area to get price quotes and to see if they had access to sourcing out a set of a front and rear PMU BBK, Motorsport Techniques had a front and rear kit available since a customer had backed out of a deal. They had given me a deal I could not refuse therefore I had to hop on the deal.
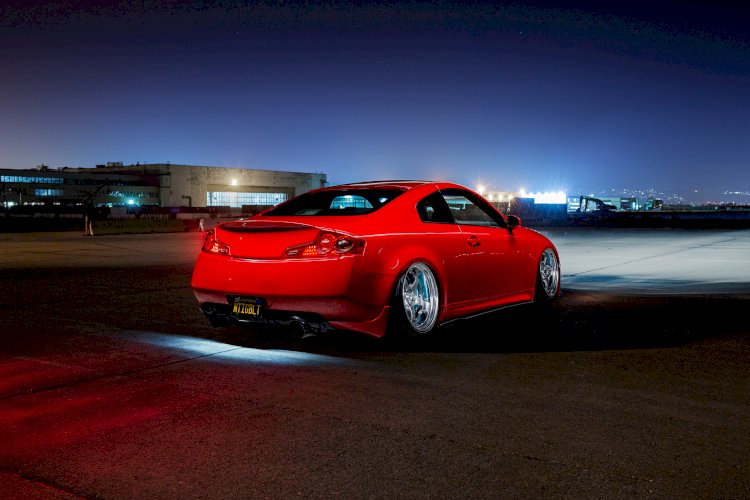
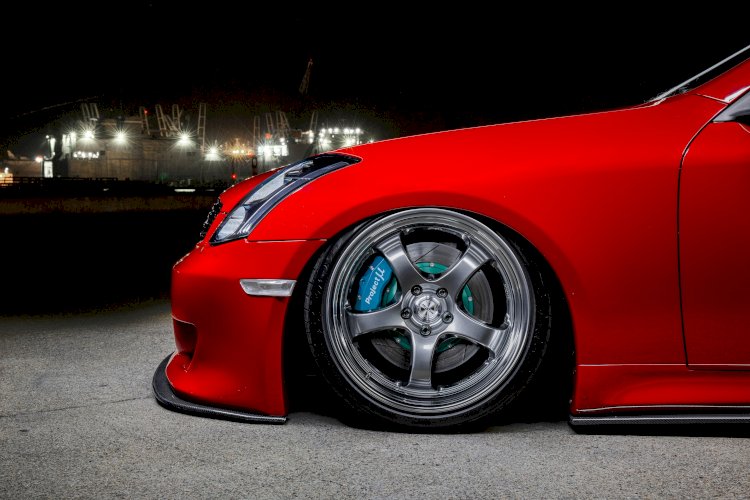
Next, after the brakes were a new set of wheels. I wanted a five-spoke design that would expose more of the Project Mu BBK. That was when I had reached out to Nat Huynh and Carlin Chiu at Impact Performance. After browsing through the Work Wheel Catalog, I had decided to go with the Work S1R In a burning black finish. Since the wheels were custom ordered they took roughly five months till they arrived in the states.
With new wheels also comes with a better stance which is where Carlin was able to assist. Carlin had Installed an Accuair/Airlift suspension along with front and rear camber kits. The air install is very stealthy and cannot be seen. To this day I do get questions If I am on air since the tank and management Are not visible.
Modifications
Exterior:
- Kuruma Front Bumper
- OCG CF front Splitter
- 06 sport sides
- OCG CF side splitters
- 06 projector headlights
- JDM Taillights
- Inven Roof Spoiler
- Custom moulded lip spoiler to a factory trunk
- JDM corners
- Ionic Dynamics CF rear diffuser
Engine:
Tuned by Shaun Church from Church Automotive Testing
- Full wire tuck
- Colour-matched valve covers
- Polished APS Tallboy Plenum with shaved tabs
- Polished lower plenum with shaved tabs
- Polished intake runner
- Polished timing cover
- Polished cam covers
- Polished VTC Housings
- Chromed Bolts & 200 + SS Allen head screws replacing the stock bolts
- Vortech V3 Supercharger with polished plate and piping
- RK Titanium custom charge pipe
- Polished Koyo V Core 36mm Aluminum Racing Radiator
- OSIRIS Management
- Polished fan shroud with SPAL fans
- Polished Circuit Sport oil catch can
- Polished PS Tank
- Polished coolant reservoir tank
- Polished pulley brackets
- CJM Fuel Rails
- Bosch EV14 1000CC injectors
- Aeromotive Fuel Pump
- Polished PS Pump
- Earls SS hoses and AN fittings
- Modified and chromed coolant pipes
- Polished and heat-treated ARC Cooling Plate
- Polished and heat-treated ARC Strut Bar
- ARC oil cap with TI bolts
- ARC oil pan
- Tanabe Exhaust (cerakoted)
- Earls Oil cooler
- Fast Intentions test pipes
- Rare JDM aluminium undertray
- Shaved and colour-matched core support and battery covers
- NRG Chrome hood dampers
- Polished AC lines
- Chrome hood latch
- Chrome PS bracket
Interior:
- Suede headliner
- Suede A, B, C Pillars
- Custom suede door inserts with red stitching
- Emmtuning custom steering wheel with CF, Alcantara with red stitching
- Emmtuning CF steering wheel backing panel
- Emmtuning CF window switch covers
- Emmtuning CF Door handle trim covers
- Emmtuning CF Center Console
- Emmtuning CF rear console
- Emmtuning CF shifter plate
- Emmtuning CF radio bezel
- Tanabe Gauges (Boost, oil press, and oil temp)
- ARC Ti knob
- Custom Recaro Sportline Seats (leather/Alcantara with red stitching)
- Custom rear seats (leather/Alcantara with red stitching)
- Chromed Harness Bar
- Black Takata Harnesses
Suspension:
- SPL front and rear camber Kits
- Energy suspension bushings
- Stillen Swaybars
- GT Spec rear tie bar
- Airlift Performance front and rear struts/bags
- Accuair e-level Management
- Dual 440cc compressors and 4 gal specialities tank (stealth setup)
Brakes:
- Project Mu front and rear BBK with 355F & 335R mm slotted rotors
Wheels & Tires:
- Work S1R (19x10.5 +0 rear 19x9.5 +0 front)
- Toyo Proxes 1 235/35/19 F 255/35/19 R
- Neochrome Project Kicks R40 lug nuts
I.C.E/Audio:
- Sound innovations custom install
- 2 10” Hertz hi-energy subwoofers
- Hertz Hi-energy 165 XL components
- Hertz Hi-energy coax
- Pioneer NEX 4201 double din
- ARC XXK Amps (sub/4 champ)
- Audison Bit one processor
- Stinger wiring
- Stinger power supply
- Rear and front cam
- Odyssey Battery
As far as future plans for the car, the car is pretty much complete for now. I plan on saving up for a car that I've been wanting for the longest but can't quite pull the trigger just yet, a Porsche GT3.
Shout out:
My wife Angela, mom, pop, Jon, family and extended family for their support with this build; Randy & Hoai Riggs, Dave Rikimaru, Chris Berry, Ryan Tabata, Marcus Cooke; Danh Vo at Tanabe; Nat Huynh, Eric Lam and Carlin at Impact Performance, The Staff at Motorsport Techniques; Ron, Ruel and Kim at Grand Collision, Junior and Ernie @Sound Innovations, Marty @Emmtuning, qu1ckworks, Eddie vertex_g35, Jim Lau, Ludger Quiocho, My Endless Projects Family, OG Stillmotion crew, 38Carmodz, auto lounge, Joe and the d10 crew, and many more who have supported my build. Sorry, there are too many of you to list.
Thank you for the opportunity Stance Auto Mag and for having to read about my build.
What do you think?
Please leave your comments in the comments section at the bottom of the page
'The future is bright as long as we can still Smell the Fumes'
Stay Up to Date Check Out Our Google News and give us a Follow
All of our Magazine can be found on Amazon, they Print and Deliver worldwide, Stance Auto can not be held responsible for the final print, all complaints and returns must be directed to Amazon.
UKTM no: UK00003572459
 Like
0
Like
0
 Dislike
0
Dislike
0
 Love
1
Love
1
 Funny
0
Funny
0
 Angry
0
Angry
0
 Sad
0
Sad
0
 Wow
0
Wow
0